Kubernetes Explained: A Beginner's Guide to Modern Container Orchestration
Learn Kubernetes from scratch with this beginner-friendly guide. Understand its architecture, Pods, Deployments, Services, scaling, and how to deploy your first application with practical examples and essential kubectl commands.
Introduction
Modern software applications are very different from the applications we built a decade ago. Instead of running as one large program on a single server, today's applications are often made up of many smaller services that work together. This architecture, known as microservices, makes applications more scalable, flexible, and easier to maintain.
To package these services, developers commonly use containers. Containers ensure that an application runs consistently across different environments by bundling the application code with all its dependencies. Tools like Docker have made containers incredibly popular because they simplify development and deployment.
However, as applications grow, managing hundreds or even thousands of containers across multiple servers becomes a challenge. Questions quickly arise:
What happens if a container crashes?
How do you handle sudden spikes in user traffic?
How do you update applications without downtime?
How do you ensure applications remain available if a server fails?
Managing all of this manually is time-consuming and prone to errors.
This is where Kubernetes comes in.
Kubernetes is an open-source platform that automates the deployment, scaling, networking, and management of containerized applications. Whether you're building a personal project or managing enterprise applications used by millions of people, Kubernetes helps keep your applications running reliably and efficiently.
In this guide, you'll learn what Kubernetes is, why it was created, how it differs from Docker, and why it has become one of the most important technologies in modern cloud computing.
What is Kubernetes?
Kubernetes, often abbreviated as K8s, is an open-source container orchestration platform that helps manage containerized applications across one or more servers.
While Docker helps you build and run containers, Kubernetes is responsible for managing those containers at scale. It automates tasks that would otherwise require constant manual effort, such as starting containers, replacing failed ones, distributing traffic, and scaling applications based on demand.
Think of Kubernetes as a smart manager for your containers. Instead of manually monitoring every application, you tell Kubernetes what you want—for example, "I always want three instances of my application running." Kubernetes continuously works in the background to make sure that requirement is met.
If one instance crashes, Kubernetes automatically starts another one. If traffic increases, it can launch additional instances to handle the extra load. If traffic decreases, it can reduce the number of running instances to save resources.
Originally developed by Google based on years of experience managing large-scale applications, Kubernetes is now maintained by the Cloud Native Computing Foundation (CNCF) and has become the industry standard for container orchestration.
Why Was Kubernetes Created?
Before Kubernetes existed, managing applications across multiple servers was largely a manual process.
Imagine a company running hundreds of containers across dozens of servers. Every day, system administrators had to:
Deploy new application versions.
Monitor running containers.
Restart failed applications.
Distribute traffic between servers.
Scale applications during peak usage.
Roll back updates if something went wrong.
As applications became larger and more distributed, these manual processes became increasingly difficult to manage.
Kubernetes was created to solve these challenges by automating infrastructure management.
Instead of manually performing repetitive tasks, developers simply define the desired state of their application. Kubernetes then ensures that the actual state always matches the desired state.
For example, if you specify that your application should always have five running instances, Kubernetes continuously monitors the cluster. If one instance fails, it automatically creates a replacement without requiring manual intervention.
This automation reduces downtime, improves reliability, and allows development teams to focus on building software instead of managing servers.
Docker vs Kubernetes
Many beginners confuse Docker and Kubernetes because they are often used together. However, they serve different purposes.
Docker is a platform for creating, packaging, and running applications inside containers. It ensures that an application behaves consistently across different environments.
Kubernetes, on the other hand, manages those containers after they have been created. It decides where containers should run, monitors their health, replaces failed containers, and scales applications as needed.
A simple way to understand the difference is:
Docker builds and runs containers.
Kubernetes manages containers across multiple machines.
Docker vs Kubernetes Comparison:
Feature | Docker | Kubernetes |
|---|---|---|
Primary Purpose | Create and run containers | Manage containers at scale |
Handles Multiple Servers | No | Yes |
Automatic Scaling | Limited | Yes |
Self-Healing | No | Yes |
Load Balancing | No | Yes |
Rolling Updates | Basic | Advanced |
Best For | Local development and small applications | Production and enterprise environments |
The two technologies complement each other rather than compete. In many real-world projects, developers use Docker to build container images and Kubernetes to deploy and manage those images in production.
Why Kubernetes Matters
Modern businesses expect their applications to be available 24 hours a day, 7 days a week. Users also expect websites and services to remain fast and responsive, even during periods of heavy traffic.
Without automation, maintaining this level of reliability would require significant manual effort.
Kubernetes addresses this challenge by providing several powerful capabilities:
Automatic Scaling
If your application experiences increased traffic, Kubernetes can automatically create additional application instances to handle the extra load.
Self-Healing
If a container crashes or a server becomes unavailable, Kubernetes detects the problem and automatically replaces the failed container.
Load Balancing
Kubernetes distributes incoming requests evenly across healthy application instances, preventing any single server from becoming overloaded.
Rolling Updates
New application versions can be deployed gradually, allowing users to continue using the application while updates are in progress.
Efficient Resource Usage
Kubernetes schedules workloads intelligently, making efficient use of available CPU and memory resources across the cluster.
These features improve application reliability, reduce operational overhead, and help organizations deliver a better user experience.
Real-World Example
Imagine you own an online food delivery platform.
On a typical weekday, your application serves around 10,000 users. During weekends or special promotions, that number may increase to 100,000 users within a short period.
Without Kubernetes, your team would need to:
Launch additional servers manually.
Deploy more application containers.
Configure load balancing.
Monitor application health.
Replace failed containers.
This process takes time and increases the risk of downtime.
With Kubernetes, the entire process is automated.
As user traffic increases, Kubernetes launches additional application instances to handle the load. It distributes requests evenly across all healthy instances and continuously monitors their health. If one instance fails, it automatically creates a replacement.
When traffic returns to normal, Kubernetes removes unnecessary instances, helping reduce infrastructure costs.
This ability to adapt automatically to changing demand is one of the main reasons Kubernetes is widely adopted by companies building modern cloud-native applications.
Kubernetes Architecture: Understanding How Kubernetes Works
In the previous section, you learned what Kubernetes is, why it was created, and how it differs from Docker. Now it's time to understand how Kubernetes works behind the scenes.
Although Kubernetes may seem complicated at first, its architecture is based on a few simple concepts. Once you understand these core components, managing containerized applications becomes much easier.
Think of Kubernetes as a company:
The Control Plane is the management team that makes decisions.
The Worker Nodes are the employees who perform the actual work.
Pods are the workstations where your applications run.
Together, these components form a Kubernetes Cluster.
Kubernetes Architecture Overview
A Kubernetes cluster is made up of two main parts:
Control Plane
Worker Nodes
The Control Plane manages the entire cluster, while the Worker Nodes run your applications.
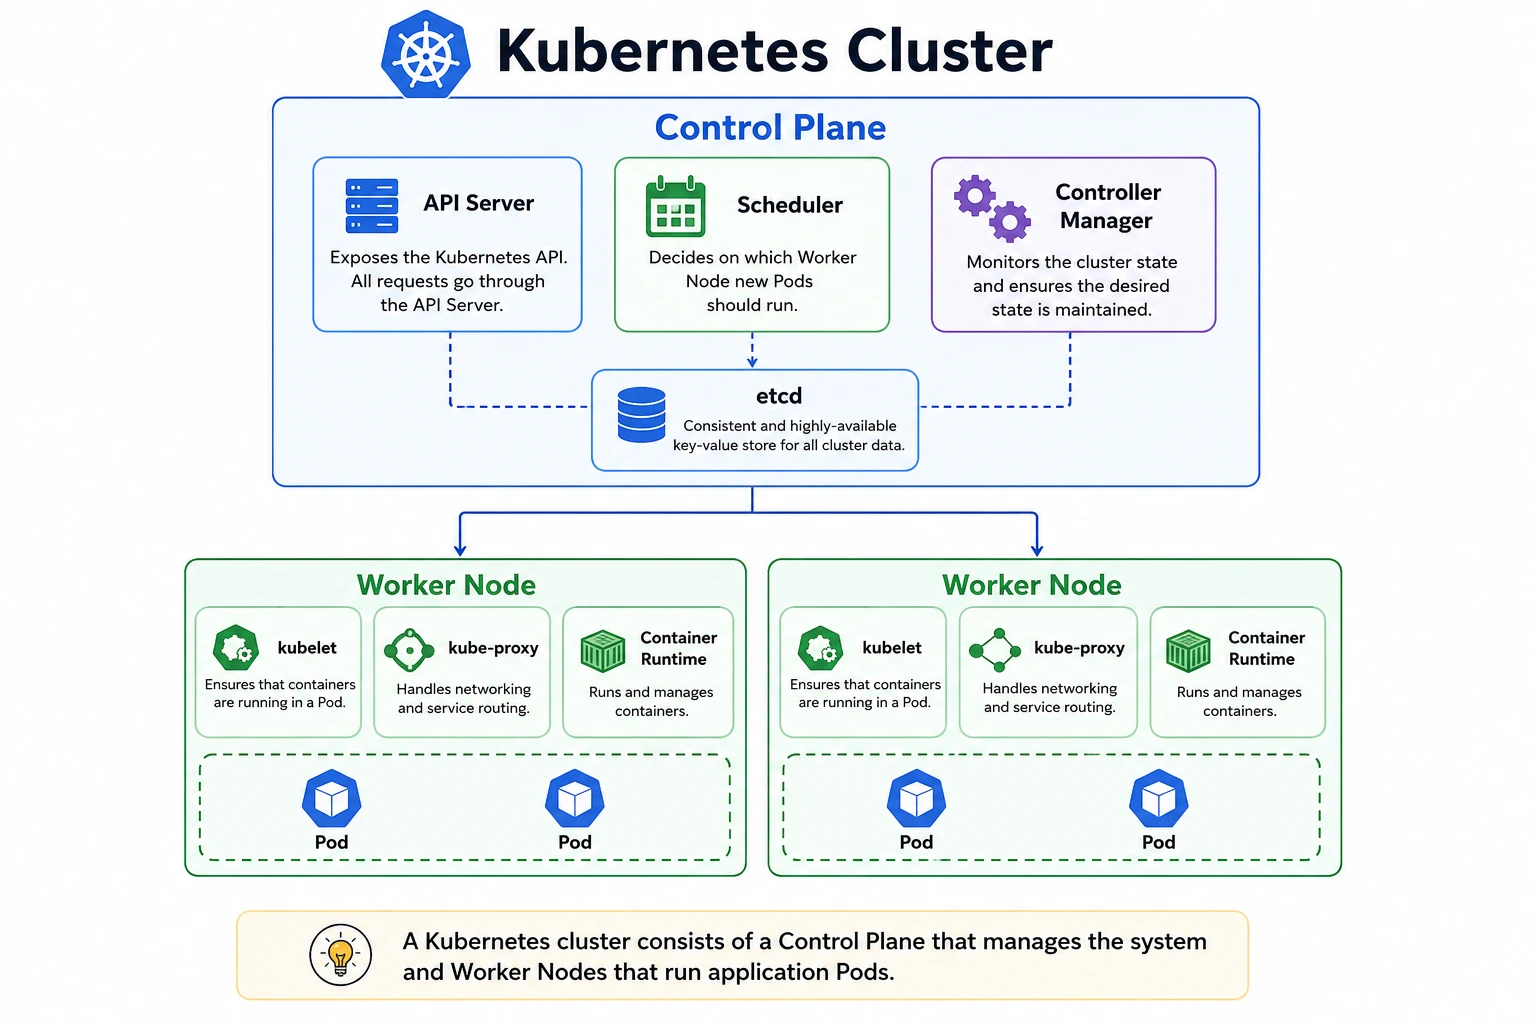
What is the Control Plane?
The Control Plane is often called the brain of Kubernetes.
It is responsible for managing the entire cluster and ensuring everything works as expected. Whenever you create, update, or delete an application, the request first reaches the Control Plane.
Its main responsibilities include:
Receiving commands from users.
Scheduling applications on available nodes.
Monitoring the health of the cluster.
Restarting failed applications.
Maintaining the desired state of the cluster.
Let's look at its main components.
API Server
The API Server is the entry point for all Kubernetes operations.
Whenever you run a command like:
kubectl get podsThe request is sent to the API Server.
The API Server:
Authenticates the request.
Validates the request.
Stores or retrieves information.
Sends the appropriate response.
Think of it as the receptionist of a company—it receives every request and forwards it to the correct department.
Scheduler
The Scheduler decides where new Pods should run.
Imagine your cluster has three Worker Nodes:
Node A is using 90% CPU.
Node B is using 35% CPU.
Node C is using 20% CPU.
If you deploy a new application, the Scheduler analyzes available resources and chooses the most suitable Worker Node.
This intelligent scheduling helps Kubernetes use resources efficiently.
Controller Manager
The Controller Manager continuously monitors the cluster.
Suppose your Deployment specifies that three Pods should always be running.
If one Pod crashes unexpectedly, the Controller Manager notices that only two Pods are running and immediately creates another one.
This automatic recovery process is known as self-healing.
etcd
The etcd database stores all information about the Kubernetes cluster.
It contains details such as:
Running Pods
Deployments
Services
Nodes
Configuration
Cluster state
If Kubernetes needs to know the current status of the cluster, it retrieves that information from etcd.
You can think of etcd as Kubernetes' memory.
What are Worker Nodes?
While the Control Plane manages the cluster, Worker Nodes perform the actual work.
Each Worker Node runs one or more application Pods.
A Worker Node contains:
kubelet
kube-proxy
Container Runtime
Pods
These components work together to run and manage your applications.
kubelet
The kubelet is an agent that runs on every Worker Node.
It communicates with the Control Plane and ensures that the correct Pods are running.
Its responsibilities include:
Starting containers.
Monitoring Pods.
Reporting node health.
Restarting failed containers.
kube-proxy
Applications running inside different Pods need to communicate with each other.
The kube-proxy manages networking by forwarding requests and distributing traffic between Pods.
It helps ensure reliable communication inside the Kubernetes cluster.
Container Runtime
The Container Runtime is responsible for actually running containers.
Modern Kubernetes clusters commonly use:
containerd
CRI-O
The Container Runtime:
Downloads container images.
Starts containers.
Stops containers.
Manages container execution.
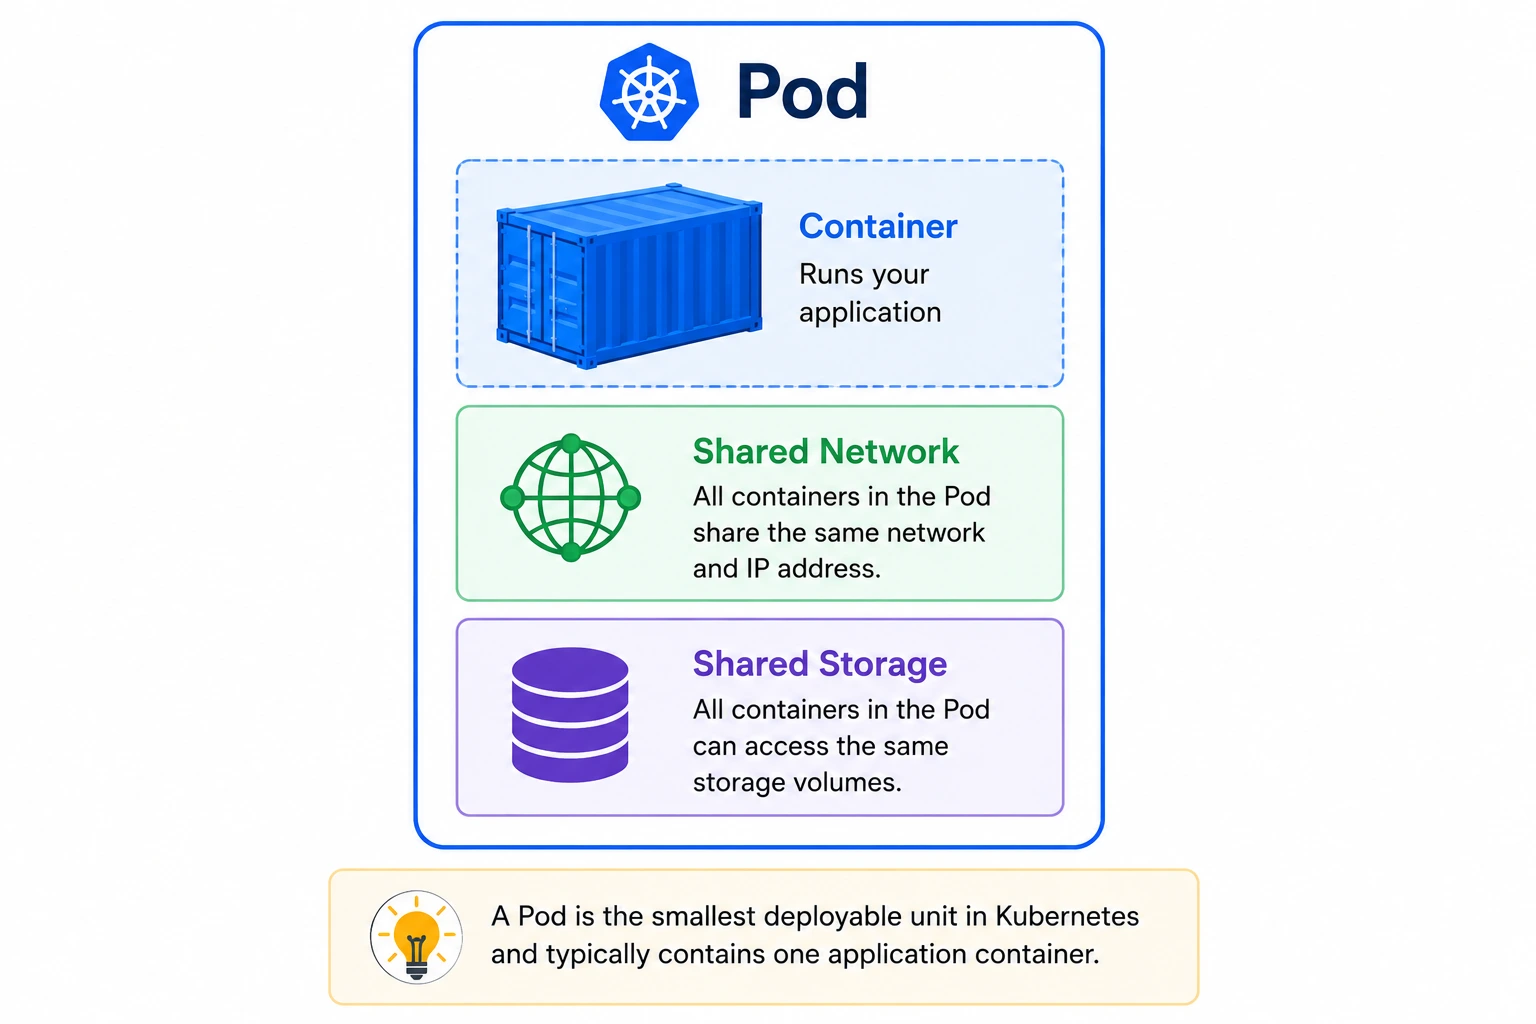
What is a Pod?
A Pod is the smallest deployable unit in Kubernetes.
Although developers often say they are deploying a container, Kubernetes actually deploys Pods.
A Pod usually contains:
One application container
Shared network
Shared storage (if configured)
Each Pod receives its own IP address and can communicate with other Pods in the cluster.
Creating Your First Pod
Below is a simple Pod definition:
apiVersion: v1
kind: Pod

metadata:
  name: nginx-pod

spec:
  containers:
    - name: nginx
      image: nginx:latest
      ports:
        - containerPort: 80
Deploy the Pod:
kubectl apply -f pod.yamlView running Pods:
kubectl get podsWhat is a Deployment?
Creating Pods manually is useful for learning, but it is not recommended for production environments.
Instead, Kubernetes uses Deployments.
A Deployment manages Pods automatically by:
Creating Pods.
Replacing failed Pods.
Scaling applications.
Performing rolling updates.
Rolling back failed updates.
Example Deployment:
apiVersion: apps/v1
kind: Deployment

metadata:
  name: nginx-deployment

spec:
  replicas: 3

  selector:
    matchLabels:
      app: nginx

  template:
    metadata:
      labels:
        app: nginx

    spec:
      containers:
      - name: nginx
        image: nginx:latest
Deploy it:
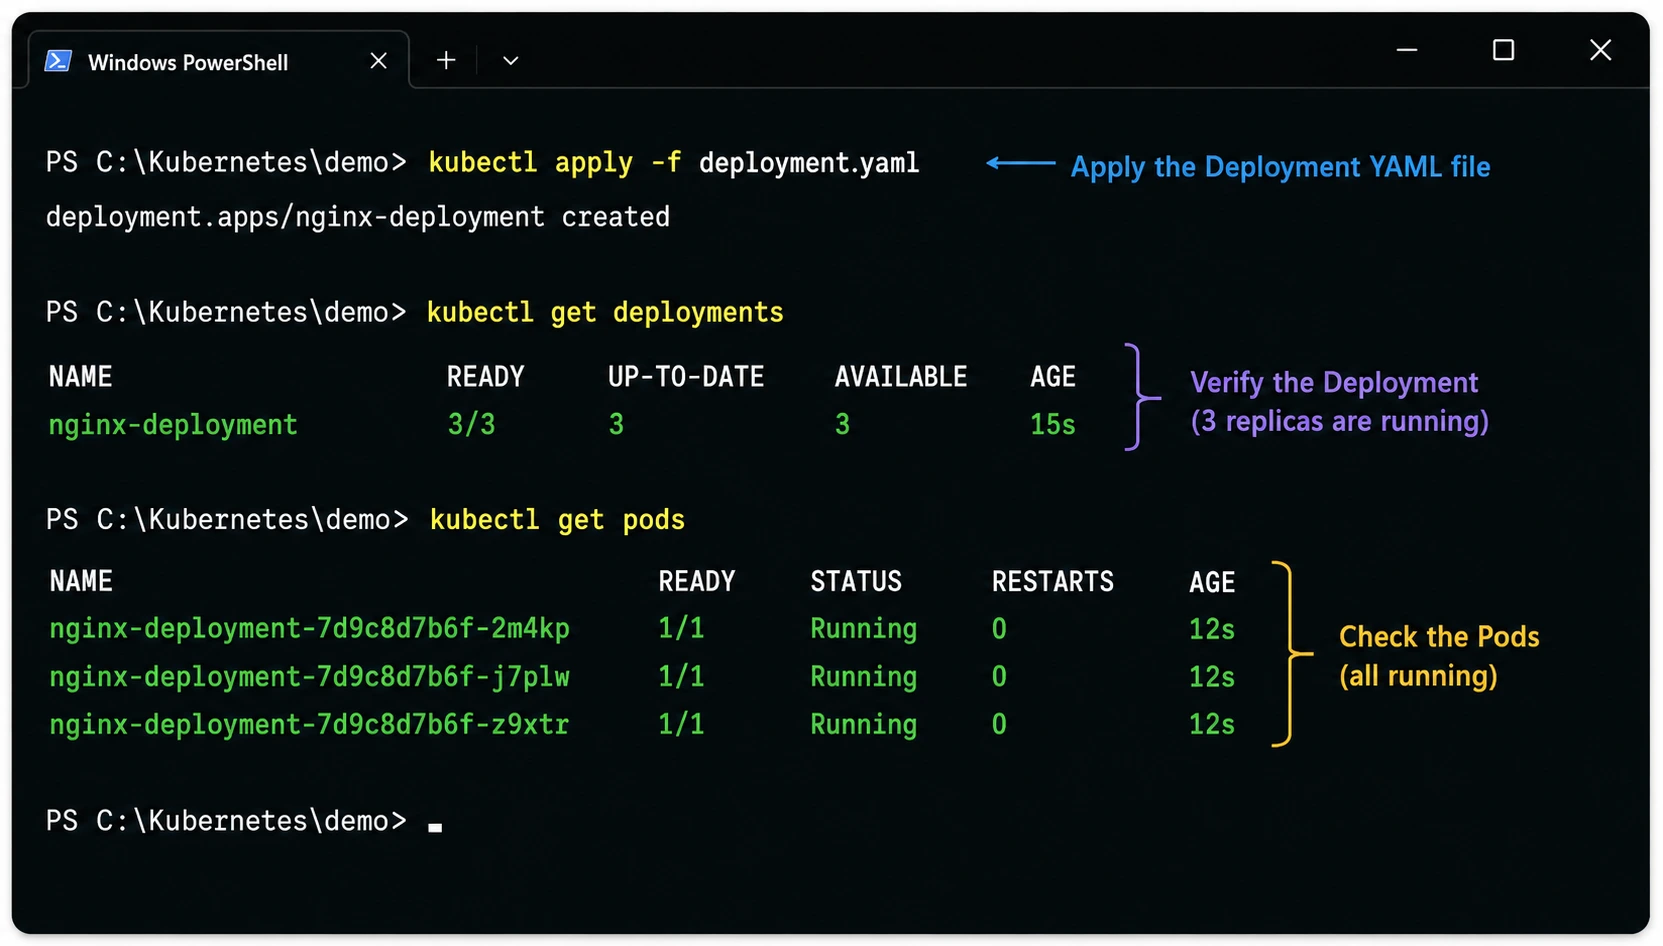
kubectl apply -f deployment.yamlNow Kubernetes automatically creates three Pods and keeps them running.
What is a Service?
Pods are temporary. If a Pod is recreated, its IP address changes.
To solve this problem, Kubernetes uses Services.
A Service provides a stable network endpoint that forwards requests to healthy Pods.
Benefits of Services include:
Stable IP address
Built-in load balancing
Easy communication between applications
Automatic traffic distribution
Example Service:
apiVersion: v1
kind: Service

metadata:
  name: nginx-service

spec:
  selector:
    app: nginx

  ports:
    - port: 80
      targetPort: 80

  type: LoadBalancer
Apply it:
kubectl apply -f service.yamlScaling Applications
One of Kubernetes' most powerful features is automatic scaling.
Suppose your website normally serves 5,000 visitors per day. During a major sale, traffic suddenly increases to 100,000 visitors.
Instead of manually creating new servers, Kubernetes can scale your application automatically.
You can also scale manually using:
kubectl scale deployment nginx-deployment --replicas=5Kubernetes immediately creates two additional Pods, increasing the total from three to five.
If traffic decreases later, you can reduce the number of replicas, helping save infrastructure costs.
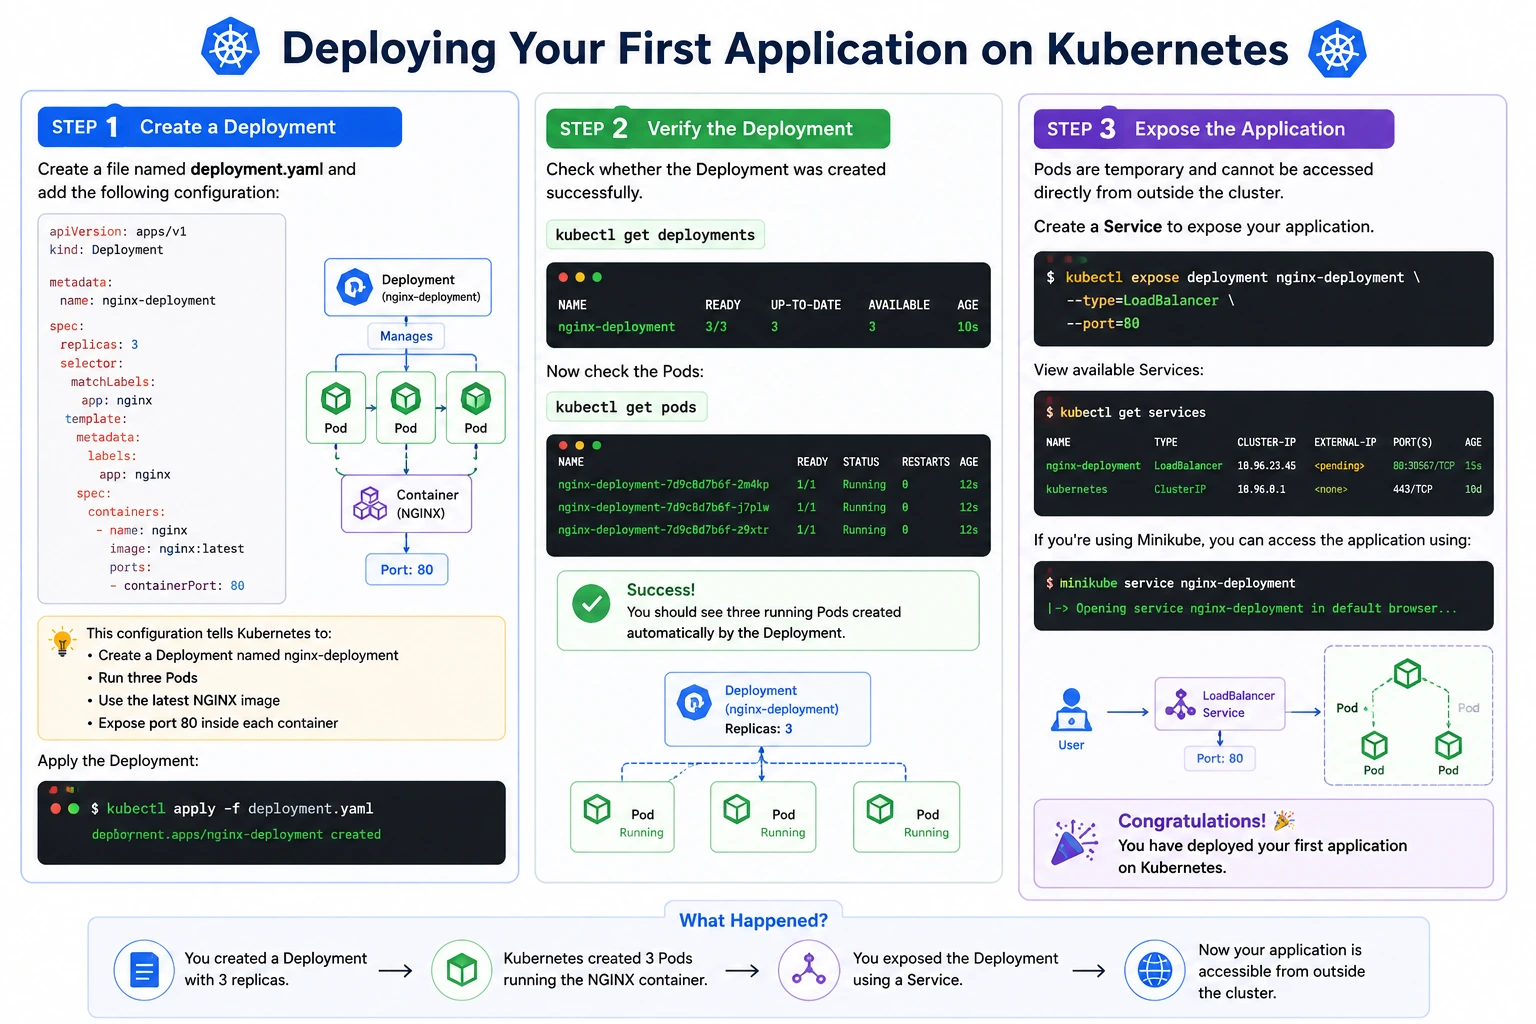
Deploying Your First Application on Kubernetes
Now that you understand Kubernetes architecture and its core components, it's time to deploy your first application. In this example, we'll deploy a simple NGINX web server to a Kubernetes cluster.
Before you begin, ensure you have:
A running Kubernetes cluster (Minikube, Kind, Docker Desktop, or a cloud-based cluster)
kubectlinstalled and connected to your cluster
Step 1: Create a Deployment
Create a file named deployment.yaml and add the following configuration:
apiVersion: apps/v1
kind: Deployment

metadata:
  name: nginx-deployment

spec:
  replicas: 3

  selector:
    matchLabels:
      app: nginx

  template:
    metadata:
      labels:
        app: nginx

    spec:
      containers:
      - name: nginx
        image: nginx:latest

        ports:
        - containerPort: 80
This configuration tells Kubernetes to:
Create a Deployment named nginx-deployment
Run three Pods
Use the latest NGINX image
Expose port 80 inside each container
Apply the Deployment:
kubectl apply -f deployment.yaml
Step 2: Verify the Deployment
Check whether the Deployment was created successfully.
kubectl get deploymentsExample output:
NAME                READY   UP-TO-DATE   AVAILABLE

nginx-deployment    3/3     3            3
Now check the Pods:
kubectl get podsYou should see three running Pods created automatically by the Deployment.
Step 3: Expose the Application
Pods are temporary and cannot be accessed directly from outside the cluster.
Create a Service to expose your application.
kubectl expose deployment nginx-deployment \
--type=LoadBalancer \
--port=80
View available Services:
kubectl get servicesIf you're using Minikube, you can access the application using:
minikube service nginx-deploymentCongratulations! 🎉 You have deployed your first application on Kubernetes.
Essential kubectl Commands
The kubectl command-line tool is the primary way to communicate with a Kubernetes cluster. Learning these commands will help you manage applications, inspect resources, and troubleshoot issues effectively.
Command | Description |
|---|---|
| Display all running Pods |
| List Deployments |
| Show Services |
| Display Worker Nodes |
| List all Namespaces |
| Show detailed information about a Pod |
| View container logs |
| Access a running container |
| Create or update resources |
| Delete resources |
| Scale a Deployment |
| Check deployment progress |
| Roll back to a previous version |
Tip: Practice these commands regularly. They are the foundation of Kubernetes administration and troubleshooting.
Kubernetes Best Practices
As you begin working with Kubernetes, following best practices will help you build reliable, secure, and scalable applications.
Use Deployments Instead of Individual Pods
Deployments automatically recreate failed Pods, support scaling, and simplify application updates.
Organize Resources with Namespaces
Separate environments such as Development, Testing, and Production into different Namespaces to keep your cluster organized.
Set Resource Requests and Limits
Always define CPU and memory limits to prevent a single application from consuming all available resources.
Use Health Checks
Configure Liveness and Readiness Probes so Kubernetes can detect unhealthy containers and recover automatically.
Store Sensitive Information Securely
Never store passwords or API keys directly in your application code. Use Kubernetes Secrets to manage sensitive information securely.
Monitor Your Cluster
Use monitoring tools such as Prometheus and Grafana to track cluster health, resource usage, and application performance.
Keep Kubernetes Updated
Regularly update your Kubernetes version and container images to receive security patches, bug fixes, and new features.
Benefits of Kubernetes
Kubernetes has become the standard platform for container orchestration because it offers several key advantages.
Automatic Scaling
Applications can automatically scale up during periods of high traffic and scale down when demand decrease
Self-Healing
If a Pod or Worker Node fails, Kubernetes automatically creates replacements to maintain application availability.
3. High Availability
Applications continue running even if individual containers or servers fail, reducing downtime.
Efficient Resource Utilization
Kubernetes intelligently schedules workloads to maximize CPU and memory usage across the cluster.
Rolling Updates
New application versions can be deployed gradually without interrupting users.
Portability
Applications packaged in containers can run consistently across local environments, private data centers, and major cloud providers.
Common Beginner Mistakes
Learning Kubernetes can feel overwhelming at first. Avoiding these common mistakes will make your learning journey much smoother.
Creating Pods Directly
Pods should generally be managed through Deployments rather than created manually.
Ignoring Resource Limits
Without CPU and memory limits, a single application can negatively impact other workloads running in the cluster.
Running Everything in the Default Namespace
Using separate Namespaces improves organization, security, and resource management.
Hardcoding Configuration
Avoid embedding configuration values or credentials directly into your application. Use ConfigMaps and Secrets instead.
Not Monitoring Applications
Without monitoring and logging, identifying and resolving production issues becomes much more difficult.
Skipping Hands-On Practice
Reading about Kubernetes is valuable, but practical experience is essential. Set up a local cluster and experiment with Deployments, Services, and scaling to reinforce your understanding.
Frequently Asked Questions (FAQs)
1. Is Kubernetes difficult to learn?
Kubernetes introduces several new concepts, but with a basic understanding of Docker and containers, it becomes much easier. Regular hands-on practice is the key to mastering Kubernetes.
2. Do I need Docker before learning Kubernetes?
Yes. Docker teaches you how containers work, making it much easier to understand how Kubernetes manages them.
3. Can Kubernetes run without Docker?
Yes. Modern Kubernetes clusters commonly use container runtimes such as containerd or CRI-O, although Docker is still widely used for building container images.
4. Is Kubernetes free?
Kubernetes itself is open-source and free to use. However, running a Kubernetes cluster requires servers or cloud infrastructure, which may incur costs.
5. Can I run Kubernetes on my laptop?
Absolutely. Tools like Minikube, Kind, and Docker Desktop allow you to create a local Kubernetes cluster for learning and development.
6. Which companies use Kubernetes?
Many leading organizations rely on Kubernetes, including Google, Microsoft, Amazon, Spotify, Airbnb, and numerous startups and enterprises worldwide.
Conclusion
Kubernetes has transformed the way modern applications are deployed and managed. By automating deployment, scaling, networking, and recovery, it enables teams to build applications that are reliable, scalable, and resilient.
Throughout this guide, you learned:
What Kubernetes is and why it was created
The difference between Docker and Kubernetes
How Kubernetes architecture is organized
The roles of the Control Plane, Worker Nodes, Pods, Deployments, and Services
How to deploy your first application
Essential
kubectlcommandsBest practices for managing Kubernetes workloads
Common beginner mistakes to avoid
Kubernetes may seem complex at first, but every expert started as a beginner. Start with a local cluster, deploy simple applications, and gradually explore advanced topics such as Helm, Ingress, StatefulSets, Horizontal Pod Autoscaling (HPA), and GitOps.
With consistent practice, Kubernetes will become one of the most valuable skills in your cloud computing and DevOps journey.
Ready to go deeper?
Professional Training
Hands-on, mentor-led training aligned with industry certifications.
About the Author
Sharper every day
Daily tutorials, analysis, and career playbooks across all 12 Xcademia disciplines, straight to your inbox. No spam.